Category Archives: Salvage yards

Entranced

Our hall is dark and narrow. As an introduction to our home, it is less than inspiring. At a touch over 3 feet wide, it is definitely a one-person space.

One person and maybe the dog, if she is feeling pushy.

So when people come over, it becomes an elegant dance, sashaying back down the hallway, to allow them to enter our home single file.

The hall when we first bought the house

What to do with a small dark space is an eternal design dilemma. Conventional wisdom says that if you paint a small space a light color, then it will seem larger, but I beg to differ. Painting a space as narrow and dark as our entry hall something pale and dull does nothing for it.

In fact, it only acts to emphasize exactly how small and dark it is. Small. Dark. And dull.

The previous owners attempted to get around this problem by coating the hall with wallpaper and mirrored wall tile. Remember?

Delicious mirror tile (not)

And equally delicious wallpaper (equally not)

Which were the first things to go when we got the keys to the house.

Stripping wallpaper

And removing mirror tile

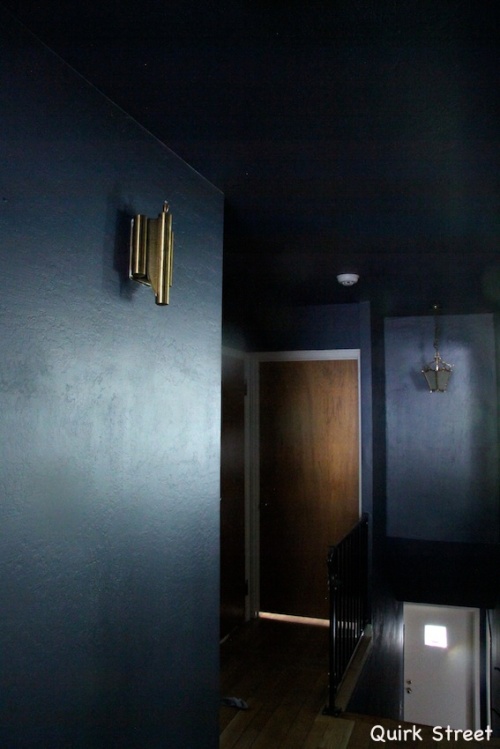
My solution is somewhat different. The hall will never be anything but dark and narrow, so why not go with that and paint it a lovely luminous rich color? This will not ‘shrink’ the space, but rather gives it personality and presence.

Consequently, this last week I have been painting the hall the lovely rich blue that is on our lounge accent wall, and also on the kitchen cabinets. Benjamin Moore Newburyport Blue.

I started out by cutting in.

Which was fine until I got around to the space above the stairwell. I couldn’t reach this from any ladder we had, so I at first attempted to use the paint edger I had used for the high spots in the garage.

Because the ceiling is so heavily textured, though, getting a straight line was impossible. It resulted in a wibbly wobbly line that looked like it had been painted by someone crazed AND drunk. I didn’t take any photos, mainly because I found it altogether too depressing.

There are also no photos because it took all of 5 seconds before I panicked at how dreadful it looked and concluded the only possible solution was to paint the ceiling the same color.

Which I promptly did.

Hall with dark ceiling

Ugh. I hate dark ceilings. Unless your ceilings are gloriously high, they just feel oppressive.

I lived with those ceilings for a whole 3 days before I started to paint them light again.

The solution? I placed 2 sturdy planks of wood across the balustrades above the stairwell. And climbed up on them, so I could reach the top.

Putting 2 planks across the balustrade at the top of the stairs

Which worked fabulously if you discount the fact that I have an abject fear of heights.

Just dont look down

Actually, my terror of heights was the reason it took me 3 days to begin re-paint the ceiling. It was not a paint dilemma at all, as soon as I had painted it dark, I knew I had to change it back. And pretty soon after that I had worked out the plank solution.

No, the 3 day break was how long it took for me to pluck up the courage to actually stand on those planks and do the cutting in. For a time, it was a toss up as to which would win: my offended color sensibilities or my fear.

In the end the paint issue won out. And I put my big girl pants on, climbed up there and did the deed.

All the while chanting to myself don’t look down, don’t look down. The things I do in the name of remodelling.

I was also debating what color to paint it. I always remember the most fabulous house we visited here in the Bay Area, which had a silver-leafed ceiling. It was spectacular.

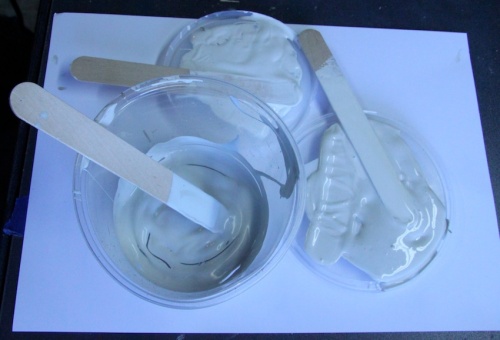
No I didn’t silver leaf it, but I decided mix some of the silver glaze I found for cheap on the mis-tint stand at the paint store with some other paint to come up with a subtle silver ceiling. The three candidates for mixing were: the original ceiling paint (the painters had left some behind from the pre-sale painting of the house); Benjamin Moore Glass Slipper (our main living room color) and Benjamin Moore White Dove (the white I used in the studio).

Which mix to use?

I went with the Glass Slipper/Silver glaze combo. It is the most beautiful subtle silvery blue. Exquisite.

So once the ceiling was painted I was ready to hang some art.

The other solution to the dark and narrow hallway dilemma is to hang art that has a lot of fine detail. You will be up close and personal with these works, so use that to your advantage, and hang work accordingly.

Great big abstracts are not appropriate here, rather small things, with lots of fine brushwork.

One of the paintings the beloved brought to our combined collection, this painting of the Standing Stones by British painter G Hillier was perfect.

G Hillier ‘Standing Stones’ 1984

You can see that he has carefully painted each strand of grass, and the texture on the stones is superb.

And my dear friend and fellow artist, Helen Earl’s beautiful sea spoons.

Helen Earl ‘Sea Spoon’ and ‘Coral Spoon’

Helen Earl ‘Coral Spoon’ detail

If you are lucky enough to live in Sydney, you can find Helen’s work at Gaffa Gallery.

Plus this little print, with its gold detailing that we picked up at a gallery at some point. And I am ashamed to admit I cant remember who the artist was. It’s perfect in the hall, though.

The painting I made for Peter not long after we met, with its text and gold detailing.

One of my earlier paintings

And this collage of mine, with its gold accents worked perfectly in the space.

Are you starting to notice the common thread here?

Gold.

Yes gold. Not a color that I have used much in interiors before, being more likely to gag and pretend to vomit at the thought. Gold taps ‘blech’ gold fixtures and fittings ‘blech, blech and BLECH!!!’

But here I am introducing gold into our hall.

Why? Well because of our glorious original door bell.

Original door bell before

Door bell after

Which makes a beautiful, classic ‘ding dong’ noise. I love it.

And when I was at the salvage yard the other day I found a light fitting to replace the ugly one in the hall.

Hall light before

Hall light after. Salvage yard find light fitting.

And it was … gold. I brought it home intending to spray paint it a much more tasteful silver/chrome color, but as soon as I put it next to the door bell, I knew it was going to stay exactly as it was.

The beloved worked his electrical magic, and now it looks wonderful.

New light fixture with door bell.

Plus gold looks so darned fantastic up against that dark mystical blue.

Check out our wonderful original light switches. Dont they look fantastic now?

Light switch before

Light switch after

At the end of the hall, to draw your eye away from its smallness and narrowness, I hung the moody seascape I painted after watching a tropical storm scoot our way over the ocean while in far north Queensland.

And swapped the horrid light fitting, for an ‘in the meantime’ Ikea one. I am planning to make something sculptural for this space.

Going down the stairs, another drawing of mine on one side.

For the other side I made and hung some picture shelves, for photos of our lovely family. They are amazingly easy to make, even with zero carpentry skills. The picture shelves I mean, not the family. Although I guess they took zero carpentry skills to make, too.

I’ll show you how to make the picture shelves next post.

This isn’t the final picture layout, I actually have better, more cohesive frames. The beloved and I have to sit down and go through our photo selection, and decide which ones we will feature, before we get the final plan implemented.

And there you have it, our hallway is done. And here are some before and afters for you:

Before

After

Before

After (with Treadwell)

After

After (with Roxy)

And with the hall and stairs done, the upstairs is done for the meantime. Kind of. Done enough for now.

Coming up soon: how to make those picture shelves, plus some house tour shots of the upstairs, because I recently realized that you haven’t seen the living room yet. Or the Dear Daughter’s bedroom.

Then the downstairs awaits …

Full Metal Jacket

Or: How To Steam Punk Your Vanity Cabinet.

Last week I promised that this post would be the big upstairs bathroom reveal, but I am not quite there yet. Those little finishing off jobs take forever.

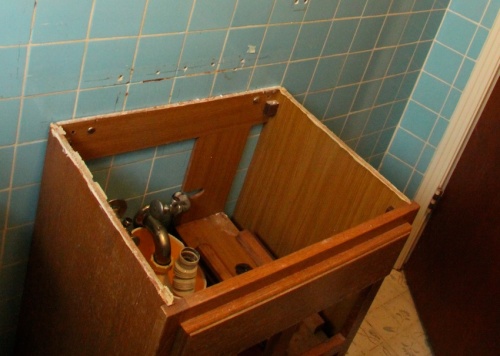
In the meantime, I thought I would share with you what I did to the very drab and outdated vanity cabinet we had in there. Here is what it looked like when we bought our place:

Original vanity

It clearly needed something doing to it. I am so excited with how it turned out, and it shows how with a few materials, and a little bit of ingenuity you can really have some fun.

The vanity has been through a number of potential manifestations. Initially, I thought I would paint it hot glossy pink like the walls. This would have worked with the white replacement vanity top I found on Craigslist, but then that got upgraded for the marble one I found for $25 at the salvage yard. I quickly realized that the top wasn’t really going to work with pink, so then I thought I would paint it blue.

Vanity with one coat of blue paint

That didn’t really do it for me either. It just looked sort of … nothing.

Then the whole floor saga happened, and I ended up laying the marble floor tile that was also a salvage yard find.

Marble tile laid

And then What To Do With The Vanity started really really bugging me. Because the vanity top is cream/off-white marble and the floor tiles are bright white and grey Carerra marble. I knew the snow white of the floor would make the vanity top look dirty. White and cream do not go together. At. All.

I thought the beloved would probably divorce me if I bought yet another vanity top (and who would blame him?), so the What To Do With The Vanity dilemma took on epic proportions. Whatever I did needed to ease the transition between the white floor and cream top. To work, it would have to be something that would distract the eye from comparing the two, but at the same time fit with both. Piece of cake, really.

It was the steam punk makeover of the vanity light that gave me the idea.

Upcycled vanity light

I could give the vanity cabinet a steam punk/industrial feel.

So what is steam punk, I hear you ask?

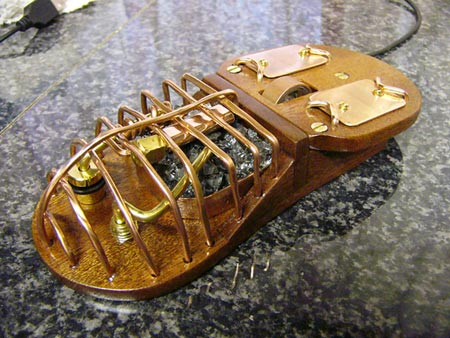
Steam punk is a design genre that emerged in the late 1980s and 90s. It spans literature, film, fashion, furniture, architecture and art, and incorporates elements of science fiction, fantasy and horror. Steam punk proposes a kind of alternate history. Imagine if the technology of today was married to the aesthetic of the Victorian age industrial innovations. Vast cast iron railway bridges and steam engines morphed into futuristic, but analogue, machines. My Fair Lady meets Barbarella.

This mouse is a great example:

Steam punk computer mouse. Image source

You get the picture.

My steam punk vanity would be clad in metal, and … and …

And have rivets.

Rivets. I love rivets.

I remember saying that to the guy that ran the metal and wood shop at Uni and he looked at me like I was deranged. And you know you have said something particularly weird, when someone who works at an Art School looks at you like that.

Seriously though, rivets are fabulous. Think of the Golden Gate Bridge, for example:

Golden Gate Bridge rivets

See? Aren’t they pretty? It’s the repetition, and making your method of joining part of the surface decoration, celebrating the join. You show how it was made, so you can marvel in the miracle of what was then modern technology.

My obsession with rivets probably really fully flowered when I lived in Sydney, and regularly traveled the Sydney Harbour Bridge, though:

detail of the Sydney Harbor Bridge

Sydney Harbour Bridge rivets. Image source.

I drove over the Sydney Harbour Bridge to my studio every day for 3 years, and it never got old. Was I looking at the spectacular view of the beautiful Harbour? No, I was checking out those wonderful rivets. Every. Single. Day.

There is something about rivets that evokes the spirit of those late 19th Century engineering marvels, when nothing was too wide to be spanned with some lengths of cast iron rivetted together. Both the Golden Gate Bridge and The Sydney Harbour Bridge have this air about them, even though they were built the 1920s and 30s.

Nothing says ‘steam punk’ like a few rivets.

It goes without saying that my vanity had to have rivets, or something like them.  I wanted to do something different with the drawers and door, though.

Door before

There I would need something to cover over that outdated moulding, and the hinges, handle and pulls would need changing, too.

Drawers before

What to do with them, though?

The previous owners had a pegboard wall in the garage, which I had pulled out while I was converting the garage into my studio. I kept the pegboard because I had toyed with the idea of painting it, and making one of those tool walls with the outlines of the tools on it.

Left over pegboard

This was revised, though, when I realized that the repetition of the holes would be a perfect counterpoint to the pattern of the rivets. I had found what I needed to cover that moulding.

Because the pegboard had holes, I spray painted the doors black first, so that the wood would not show through once the pegboard was attached.

I cut the pegboard to size, and then attached it.

Attaching the peg board

Then I spray-painted the door and drawers matt black.

Spray painted black

After that I turned my attention to the cabinet.

I love the way my brain works sometimes. You remember the aluminium flashing I used to line my card index drawers? I realized this would make the perfect metal covering for my vanity. Easy to cut and nice and shiny.

Shiny flashing

I also remembered the decorative upholstery nails that I bought to use on my rocking chair, but decided they were too shiny and used black ones instead. They would make p-e-r-f-e-c-t faux rivets.

decorative upholstery nails

I set to work attaching the metal, and adding the nails/rivets around the edges of the metal panels.

Attaching the flashing and ‘rivets’

Once that was done I added new stainless steel hardware to the door and drawers.

First the hinges.

Adding hinges

And attaching the door

And then the pulls.

Handles ready to be attached

And on …

Then it was simply a matter of reinstalling the vanity, which only took about half an hour. One advantage of spending days installing the new top and faucet initially. All the hard work was done, and I just needed to hook it up.

So, here is a reminder of what the vanity looked like originally:

Before

And here it is now.

After

Before

After

Before

After

After

Before

After

Quite a difference, huh?

The steam-punking of the vanity cabinet sparked off some other great ideas for the space. And until those things are finished, and installed in the upstairs bathroom, you are just going to have to wait to see it complete. Suffice to say that I have spent a very happy and very productive week in the studio tinkering around making stuff.

So expect some more posts over the next few days, and get ready for the big bathroom reveal.

Just as soon as I can get it done …

Absolutely floorless

Well almost. Down to the bare boards: that’s where I was last time I wrote.

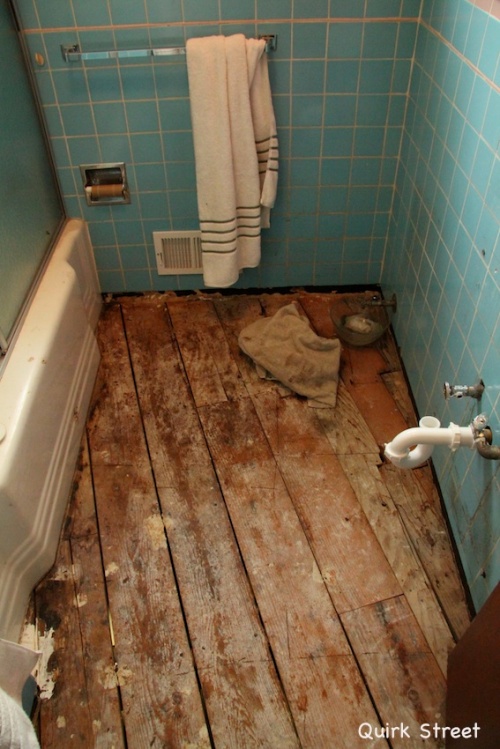
blank slate

I had wrestled out three layers of vinyl tile, then a layer of rotten plywood underfloor. After much thought and conscience wrangling, I removed the vanity, and finally the toilet. Which left me with a nice blank slate to build from.

In Australia, at this point, you would pour a concrete sub floor, and in it you would include a floor drain, called a Palazzi trap. You would grade the bathroom floor towards the Palazzi trap, so if the bathroom ever flooded, the water goes down the drain, instead of ruining the rest of the floor and the house. Then you tile on top.

They don’t do that here. Here they put down a waterproof membrane, a layer of plywood, a layer of backer board, and then a layer of tile. So if the bathroom floods or the pipes leak, you have to pull it all up again, replace the damaged bits, and start over. Which seems a little crazy to me, but that’s cultural differences for you.

Here pouring a concrete subfloor is considered old fashioned and not to code. And no one has heard of a Palazzi trap. When in America, do as the Americans.

So, down went the waterproof membrane.

A layer of waterproof membrane underneath everything

And down went the ply sub floor. This involved careful measuring, and cutting around the curved-edge bath, and the sewer pipe.

First piece of ply down

This looks challenging, doesn’t it?  It is actually quite straightforward. Lay down an over-lapping layer of masking or painter’s tape, that goes over the edges of the area you want to cut out.

Tape the area you need to cut

Use a craft knife to cut around the edges, carefully peel it away, and then you have a pattern.

Then cut out your pattern

Lay this on top of the ply sheet, and cut around it using a jigsaw.

Place pattern piece on ply, then cut with a jigsaw

See, fiddly, but not difficult. Imagine if I had to cut around the toilet and the vanity. Now THAT would have been fiddly AND tricky. Now do you see why I pulled them both out?

Eventually the ply sub floor was down.

I used the same process with the backerboard, but it needed a layer of thinset (a kind of mortar) underneath.  This ensures a smooth level surface to tile onto.

Backer board down

While I was waiting for the thinset under the backerboard to dry, I set to work on getting the tile ready to lay.

As you may remember, I found enough marble tile at our local salvage yard to do the upstairs bathroom for a grand total of $30.

Marble tile from the salvage yard

The down side of this tile was that some of it had been laid previously. So it had a layer of thinset on the back.

the disadvantage of pre-used tile

Before I could lay the tile this had to be scraped off. And it had to be done carefully so as not to break any, because when I say there was enough to do the upstairs bathroom, there was Just. Enough. To. Do. The. Upstairs. Bathroom. Eeesh.

No pressure or anything. I had about two tiles to spare, so I had to clean and make any cuts I needed to make without really breaking any. At. All. Anyone who has done any tiling knows how tricky this is.

Just as well I like a challenge.

Cleaning the tiles involved soaking them in a bucket for 24 hours to soften the mortar, then using a scraper to scrape them clean.

Soak that thinset!

It wasn’t quick or easy. Wet and repetitive. Luckily I had some assistance in the form of the two children with this process.

I would love to report that they did this happily and willingly, but actually I issued them with a 5 clean tile punishment for every misdemeanor.  Astonishingly, their behavior rapidly became angelic. They were polite to one another, and to us, helpful and cheery. They cleaned up without being asked. Their rooms were spotless, and their homework was done the second they got home.

It was quite strange. Here I was prowling around waiting to pounce on the slightest thing, and there they were frantically being as good as gold.

I think I am going to buy some more tiles from the salvage yard. I am sure I can find some other things to tile.

I know, I’ll turn the backyard into a mini version of Antoni Gaudi’s Guell Park:

Antoni Gaudi: Guell Park. image source

That should keep them out of mischief until they go to college.

I digress. Eventually the tile was all clean and ready to lay. Then I played with a few layouts, and cut all the tiles that needed to be cut to fit around sewer pipes, curvy baths and the asymmetric room itself. I was finally ready to put those tiles down.

Starting to tile

It’s at this stage you start to get excited

And very gratifying it was. After they were laid, I waited overnight and then grouted them.  Then waited over night and cleaned off the last of the grout, and then sealed the whole thing.

In the meantime, as the toilet was out already, we decided we may as well take advantage of our local City’s generous toilet rebate scheme and buy a new low flow toilet. They give you $100 if you replace your old water-waster toilet with a new Watersense accredited one. Our existing toilet used the equivalent of Niagara Falls each time we flushed, and with the rebate – and reduced water bill – as incentive, it made sense to replace it.

Cue several days of internet and Craiglist research. Eventually we settled on a toilet, and I answered a question that had been niggling at the back of my mind ever since I took the toilet out. I had successfully removed a toilet, but could I install one?

The answer to that is yes. Yes I can. And I have the photo to prove it. But as that photo also shows the tiled floor in a finished state, let me first remind you of what the floor looked like originally.

Before

Vinyl tile before

And here it is now.

After

After

After with our shiny new low flow toilet

Isn’t that better?

So the bathroom is getting ever closer to completion.

Best of all, while tiling, I finally figured out what I wanted to do with the vanity cabinet. First it was going to be pink like the walls, and then I tried the same blue as on our kitchen cabinets.

After the first coat of blue

But that wasn’t doing it for me either.

Eventually, my steam-punk upcycle of the vanity lights provided me with inspiration.

Lights post steam-punking

I decided to steam-punk the vanity cabinet. Which is exactly what I am in the process of doing. But you are going to have to wait until it is finished before I show it to you. And that will be part of the big bathroom reveal, coming next time. Stay tuned.

And in case you are wondering happened to the old toilet? I put it on Craigslist for free, of course. And someone wanted it. Really.

He came yesterday and took it away. He was from Tonga, and was going to ship it back to his village at home. I gave him the $20 white vanity top we didn’t use in the upstairs bathroom as well. He said he would take anything we had, and to call him whenever I pulled anything out, he would come and pick it up. Tongan interiors: 1. Landfill: 0.

P-e-r-f-e-c-t.

That sinking feeling

Sometimes a sinking feeling can be a good thing. I still get a thrill every time I see our new sink and faucet/tap and get to use it. But a sinking feeling can also be bad. Which is what happened every time I looked at the old sink, and wondered what on earth I was going to do with it, now we had removed it.

We are so delighted with our new sink and faucet. Even our 13 year old had to concede I had done a great job. He actually said ‘Oh wow. Mum, that’s awesome.’ Imagine.

Much to everyone’s relief I have stopped turning the tap on and off and saying ‘look it works, look at it, it works, it works. Look! Look! Look!’ with a h-u-g-e grin on my face every five minutes. I am down to about twice a day now.

Every time I did, though, there was a tiny little thought that kept niggling away at me, taking away from the pleasure of our new sink: what to do with the old one? The one that took my neighbor and me to lift it?

It lurked there, where we dumped in our front yard:

Even sitting there it irritated me. Our next rubbish clean up day is months away, and I hated the idea of it sitting there until then.

I knew our local salvage yard wouldn’t take it as it was, but it was a good solid sink, built to last, except for the enamel. Who would want it, in it’s awful stained condition? Maybe I should just take it to the dump?

Having saved one sink from landfill, however, I was reluctant to commit another to the rubbish mountain.

And then I had one of my moments of brilliance. I posted it in the Free section on Craigslist, thinking that, however unlikely it may seem, maybe, just maybe, someone might like it for their garage or studio or workshop or something …

And much to my astonishment about 20 people wanted it for exactly that reason.

Yesterday, one of them came and collected it.

So now it is gone, and I can bask in the glory of my new sink, while polishing my green halo.

Because last week I saved two sinks from landfill. And that is the best sinking feeling, ever.

Everything and the kitchen sink.

Plumbing is a bit like childbirth. It is pretty horrific while you are going through it, but once it is over you forget how bad it was. You bask in the glory of your new sink and faucet, with a profound sense of satisfaction, love and delight. You forget how challenging the process was to get it there until right before you are about to do it again, and then you remember. By that time it is too late, you are in it, and there is only one way out.

This week started well, I began work on my transformation of the upstairs bathroom, and I picked up the new counter top for our bathroom downstairs. It was while I was collecting said counter top that I noticed a stainless steel kitchen sink leaning up against a skip/dumpster outside the counter top place.

 Exciting!  You see our existing kitchen sink was disgusting.

The enamel was gone on the bottom, and no amount of scrubbing would get it clean again. When the beloved cooked a curry with a liberal amount of tumeric the other week, the bottom became a tasty shade of yellow. It was fluorescent at first, but settled into this nasty brown stain after a considerable amount of elbow action on my part. Maybe I should have stuck with the yellow.


 Which brings me to the faucet.

Existing faucet. Not exactly pretty.

It leaked like a sieve out of its side.

Not exactly functional either

Oh dear. Every time I used it, I lived in fear of a catastrophic faucet failure, plus we couldn’t keep anything that minded getting wet in the cabinet underneath.

Clearly things needed to change in the kitchen sink department.

I have mentioned our 50 cent remodelling budget before, and so I have been scanning Craigslist for weeks looking for a replacement sink. There are any amount of white enamel sinks on Craigslist, but there was no way on the planet I would replace our existing sink with another white one. They are such a pain to keep clean, and the enamel goes on them and … well why would you do that to yourself?

I know America has a love affair with white enamel sinks, I guess it is for their old timey feel. Personally, though, give me stainless steel every time. Its shiny, it cleans up beautifully and it will take anything you can throw at it. One of my beloved’s fabulous curries included.

Given the number of white enamel sinks on Craigslist, clearly America is waking up to their drawbacks as well. The stainless steel sinks on Craigslist sell in the blink of an eye, the white ones sit there for weeks before they disappear.

Having missed out on several sinks by not being obsessive and quick enough, you can imagine my delight when I found this one sitting there waiting for me.

I immediately whipped my trusty tape measure out of my bag and determined that the sink would fit in our existing sink space, gave the sink a once over to check there were no dents or anything nasty, and then hot-tailed it inside to ask the guy if he minded if I took it.

Because dumpster diving etiquette demands that you ask first. I’ve never known anyone to say no, but it is simply good manners to make the request.

The guy was happy for me to take it. He said ‘You have got a real bargain there’.

Umm, yeah, it was FREE! You can’t get a better bargain than that. Seriously.

Here it is after I got it home:

sink in my studio

Not only was it a bargain, even better it was a deep one-bowl sink. One of the other things I hated about our existing sink was the garbage disposal was attached to the really shallow small sink, which just doesn’t make sense to me. If you are rinsing crusty stuff off baking pans then surely it is better to have the garbage disposal in the big sink.

We had a wonderful weekend the other week staying with our friends W and J at Lake Tahoe, and I developed an extreme case of sink envy. They had a deep one-bowl sink, with the garbage disposal in the bottom, soap dispensers, and fabulous faucets and everything.

I came home after that weekend, refreshed and relaxed, and looked at our revolting stupid sink and garbage disposal attached to the wrong side, and its leaky faucet and sighed.

But sometimes the universe gives you what you wish for. And as an extra-added bonus occasionally it is something you are actually glad you requested.

I brought my free sink home, gained the beloved’s approval (he liked it for itself and not just because it was free), and stowed it carefully in my studio.

Now all I needed was a faucet.  On a budget of almost nothing. Back to Craigslist.

My dream faucet was one of those high arc ones; a simple contemporary design, that evoked a cool laboratory-esque style. Unfortunately these were w-a-y out of my price range. A long way out of my price range. They may as well have been on Mars.

The kind of faucet I lusted after. Image from National Builder Supply

Or so I thought. And here is a bargain tip for you. When manufacturers update their designs, and decide to stop making a particular style, they sell their leftover discontinued stock very cheaply.

And so it was that I came to be the proud owner of my dream high arc faucet, with pull out spray and all its attachments for $50. For a seriously high end German Hansgrohe faucet that a year ago would have cost me $400.  Cray-zeee. Sometimes you can play consumerism to your advantage.

I had my faucet, and I had my sink. And as with the vanity sink the other week, they sat there in my studio singing their siren installation song.

 Oh, I thought. I learned so much from installing the vanity. Putting this sink in should be a snap! Besides, I said to myself, our kitchen faucet could go at any moment. I really should get it out before it does.

You know what happens next. The plumbing equation is applied. The plumbing equation tells you the amount of time it will actually take to do a plumbing job.

 It works like this: Let (a) be the amount of time you think the job will take.  (a) x 10 = the real life time it will take.  So I thought it would take me maybe a couple of hours, and it ended up taking me 20.

I stopped taking photos really early on. Because it was that bad, and when the going gets tough, the camera stays in the camera bag.

Suffice to say it involved 20 hours of my life, about 4 hours of my neighbor’s life, a lot of swearing and ewwy drain water, lying on my back in a cupboard, plumber’s putty, caulk, teflon tape, adaptor fittings, internet troubleshooting research and trips to the hardware store.

 The 4 hours of my neighbor’s life came about because the old sink was so heavy I couldn’t lift it by myself, so I ducked over to ask if he could help me get it out. He spontaneously stayed and assited me to cut through the tile on my counter top when it became clear that the new sink wouldn’t fit in the old sink’s hole. Fantastic, awesome, and I owe him major neighborly favors as a result. I am hoping some of my plum muffins will act as a small token of my profound appreciation.

I am sure sometimes replacing sinks and faucets is as easy as they make it look on the DIY network. And if you are in a relatively new house with standard fittings it probably is. But when you are dealing with 60 year old plumbing, and ancient stop valves that are different sizes, well, shall we just say things can get more than a little interesting.

Plumbing is my idea of hell. And having done a couple of jobs around the house, I have a deep and abiding appreciation for how much plumbers charge. They deserve every cent. And when I am rich and famous, I will gladly pay them to do my plumbing for me.

In the meantime I just have to suck it up and get on with it.

Anyway, after a Herculanean plumbing ordeal, the new kitchen sink and faucet are now in. And they look beautiful, plus they work perfectly.

I think the sense of satisfaction I feel when I look at this is partly because of how much better it looks, and partly reflects the difficulty of the installation battle.

The new sink and faucet also sit beautifully with a DIY project undertaken by the beloved. Anyone who knows him will by now be gasping with incredulity.

To them I hold up my hand and say ‘enough’!  And admit I nearly fainted in shock at the time. The beloved is famous for his utter lack of anything that might remotely be known as DIY skills.

Mind you, it was electrical work. I will get down and dirty with the plumbing (although I draw the line at anything to do with toilets), but electrical stuff, no way. Terrifies me. The beloved, though, has an affinity with electronics and electrical stuff in general.

And it was him who installed new lighting in the kitchen not long after we moved in; directly after I moved the kitchen cabinets he was bumping his head on.

Here is what was there before:

Lighting before

Pretty diabolical in terms of trying to see what he was doing in the kitchen. And this is what he replaced it with:

new kitchen lights

New sink with new lights. Perfect match!

Cool, huh? Now anything electrical is his department.

So after I put the sink in, I was standing there admiring how great they looked, and feeling deeply relieved to have scraped through another plumbing task unscathed when I my eyes fell on the dreadful venetian blind we have in the kitchen.

Venetian blinds in the kitchen

One of the very few things I dislike about the house is the fact that the kitchen looks straight out onto our street.

view out kitchen window

Our street has little traffic in terms of cars, but because it is quiet, a lot of people walk along it. And as much as I don’t like looking directly out onto our cars and the street, I also don’t like passing pedestrians to have a window on our life.

So we keep the venetians mostly closed most of the time. Which cuts down on light, and makes what is a tiny weeny space seem even smaller. And I loathe venetian blinds. Especially cheap nasty damaged ones.

Ever since before we moved in I have wanted to put some privacy film on the window, but balked at the extreme cost. And then, on one of my favorite websites, Design*Sponge, I discovered this very clever trick:

DIY window project from Design*Sponge

You can use regular everyday contact – the stuff you used to cover your school books – to create an etched-glass effect. It is cheap, easy to apply and peels off readily, with no lasting damage. Great if you are renting, or want a temporary fix like I did.

It just so happened I had some clear contact knocking around, so this fix cost me a total of nothing.

Now, I debated doing something fancy with this like cutting it into cool patterns, but the kitchen is small and crammed with enough stuff without adding another layer of things to look at. So, in the end I went with something simple.

First I took down the venetions:

Removing venetians

 Oh, that is better already.

Then I had to remove some leftover wallpaper that was underneath.

Remember this? Seems like eons ago since it covered the entire kitchen:

I measured and cut out the rectangular pieces of contact:

Cleaned the window thoroughly:


And applied the contact rectangles to the window. First peel off a small amount at the top:

Peel off a small amount of backing paper and apply to the window

Rub back and forth with a cloth as you peel away the backing, it mostly goes on easily and without bubbles:

Rub back and forth with a cloth as you slowly and evenly peel off the rest of the backing paper

 Any bubbles you do get can be gently removed with rubbing. If they are really persistent, you can pierce them with a pin, and then rub them.

repeat for each window panel

And there you have it! Now I can show you the new kitchen sink and faucet in all its glory.

But first a little reminder of what the kitchen looked like originally:

The kitchen in its original state

And here it is now.

 This week our kitchen took a quantum leap. And is so much the better for it.

And now it is back to the upstairs bathroom for me. Unless something else comes along to distract me …

All is vanity

I went a little crazy on Monday. I bought another vanity top. For the upstairs bathroom. The bathroom I already just bought a new vanity top for. Which means we now have 3 vanity tops for that particular vanity. The original ewwww one, the white cultured marble (ie plastic) one I bought off Craiglist on Friday for $20, and then this other one I bought on Monday.

As a reminder, here is the original sink:

Original sink

And here is the Friday sink:

The new top I bought on Friday

I imagine you are all now thinking things like: this woman has gone barking mad, I pity her poor husband, why on earth would she buy another vanity top when she had a perfectly good one that she was so excited to find only 3 days earlier.

But it isn’t quite as loopy as it seems. Allow me to explain.

You see I had to head North a few miles up the 101 to check out potential vessel sinks for the vanity in our ensuite (which is downstairs).  So I looked them over, and snapped one up (more on this at a later date), and realized as I completed the transaction that I was very close to our local salvage yard.

Now you already know that salvage yards attract me like bugs to light, so there was no way I was going to drive home without stopping there.

One of the first rules – I might even go so far as to say The Biggest Rule – of finding bargains in salvage yards is to visit regularly. They have a high turnover of stock, and I happened to know (because I am on their email list, and I went and checked it out) that they are in the process of demolishing a large house in a very affluent suburb near here. I thought there might be some goodies from there, and even if there weren’t, you actually never know what you might serendipitously stumble upon.

As proved the case on Monday. I was perusing the new doors, and some upper cabinets (which might do as extra studio storage), when my eyes landed upon said vanity top. I drew a quick breath in. Gasp. And my heart beat a little faster.

Salvage yard vanity

I went over and had a closer look. The counter part of it was marble, real actual natural marble, creamy white with a dark grey streaks, with just a hint of brown. Not Carerra, but very nice all the same. And the sink? The sink was porcelain, with that lovely solid feel that cultured marble or acrylic never has.

Actual real natural marble. It just has to be better, right?

I whipped out the tape measure I always carry in my bag and measured it. It would fit the upstairs vanity p-e-r-f-e-c-t-l-y.

And the price? It was $25. $25 for a real marble and porcelain vanity top that would fit our upstairs vanity.  A real 2nd hand marble and porcelain vanity.

I immediately started arguing with myself.  Don’t be crazy, I told myself, you cant buy ANOTHER vanity top, you already have one that you only bought 3 days ago.

But it’s so pretty. It’s MARBLE. It is so much nicer than the other so-called ‘cultured marble’ one.

The pros and cons went round and round in my head, in various permutations for several minutes.

And then I remembered the words the beloved spoke when I bought the white Friday vanity home.  ‘But it’s plastic’ were the first words out of his mouth. Then seeing my crestfallen face, he said ‘Oh well, it looks way better than the revolting one we currently have. It will do just fine until we properly redo the upstairs bathroom.’

He paused for a minute and then said, ‘Look, it’s fine, but please don’t buy a plastic one for the vanity in our bathroom. Only replace that with ceramic or granite, or something like that. I really don’t like plastic.’ And neither do I, actually.

So it is really his fault that we ended up with 3 vanity tops. Naturally, I bought the marble and ceramic vanity top.  I loaded it in the car, and I drove home with it.

And did I march triumphantly in the door holding it aloft? No. No I didn’t. I am ashamed to say I left it in the car, and snuck inside.

Then I made the beloved some lunch, and told him how much I loved him and how wonderful he was, then said I had a confession to make. He immediately looked apprehensive.

I explained my purchase, said that it was marble and porcelain (as he liked), and that it had only cost $25. He looked immensely relieved. I wonder what he thought I was actually going to confess?

I promised to put the Friday vanity back on Craigslist. Which made him happier. And once he saw the new sink he was happier still.

So the new sink joined the Friday sink sitting in our dining area. It sat there and tempted me to install it.  ‘Put me in’ it seemed to say, seductively.

My common sense said that I should leave installing it until I had painted, but the marble vanity top kept up its siren song, and in the end I succumbed.

I put aside the final finishing off jobs in the studio that I ought to be doing, and thought I would surprise the beloved with having the new sink installed by the time he got home that evening.

removing the mirror before starting work

Installing a vanity isn’t hard. It should only take about 3 hours. Should.

How long did it take me to install the new vanity top?

3. Days.

3 excruciating days in which I took down mirrors; wrestled with removing the old sink with fittings that had fused with age; and ditto removing the old fittings off the new sink; beefed up the vanity cabinet so it would take the weight of a marble top; wrangled ancient plumbing that kept dripping; fitted new stop valves, faucets, pop-up drains and p-traps; drove back and forth to the hardware store each time I needed the next thing that had to be replaced; and tromped outside to turn the water main on and off a gazillion times.

Old plumbing

Old top gone

cutting wood to strengthen the top

Attaching wood to cabinet

removing fixtures from new sink

That drain would not budge, so out with the hacksaw

that's better

remove the taps

Give it a clean

dry run testing new sink

Seemingly endless complications from geriatric plumbing

Note to self: when dealing with old plumbing expect the worst.

A lot of this was done lying on the bathroom floor with my head in a cabinet, being dripped on by mangy old pipe water. Why do I get myself into these situations?

Oh that’s right. I wont pay someone else to do the things I can do myself. And if we want the house to look better, I am going to have to do it myself because we are on a 50 cent budget here people.

Finally, after 3 days of toil and struggle the new vanity top is in. But first – of course – a reminder of what is now gone.

Before

And after

Before

After

before

After

Before

After

Don’t you think that looks a whole lot better? And yes, I still have some cleaning to do, and a long way to go before the bathroom is done.

My problem now is that I am not sure my whole pinkalicious remodel of the bathroom is going to work with the new vanity top.

I am debating changing the color scheme, but I am not quite sure at this point which way it will take me.

I will have the weekend to think it over, though, because we are running away to Tahoe for the weekend. It will be cold, beautiful and it may well snow. Which is exciting when you come from Australia where it only snows on the very highest mountains, and you don’t have to live with it all the winter long.

It will be a weekend of friends, fun, great food and wine. And after installing that vanity top, I certainly feel like I have earned it.

In the pink

Once my studio was done, and with the drainage under control, I had thought painting the hall would be my next big project, however, this week my to-do list underwent a seismic shift. It all happened because I keep a weather eye on Craigslist.

For those of you who don’t know, Craigslist is an online classified advertisement site. You can list things for sale, and also find all sorts of brilliant stuff to buy. Mostly incredibly cheaply, including great remodelling bargains: it’s like a giant online salvage yard.

I don’t look at what’s available every day. Or even every week. I have Craigslist fits, where I become completely obsessed for a few days, and then I get bored …

In the throes of my most recent Craigslist fit, though, I managed to find something very exciting.

You see, along with ancient fixtures and fittings, both of our bathrooms are blessed with truly hideous vanity tops.  The one in the upstairs bathroom is particularly bad. Here it is:

Our existing vanity top

How do you survive looking at something like that every day? Particularly first thing in the morning when you are at your most vulnerable. You stagger out of bed, creak your way to the bathroom, and the first thing you see is …eeewww!

Well, you do it by pretending it doesn’t exist, by wilfully ignoring said item, firmly telling yourself that it’s ok, one day it will no longer be there. There are a lot of these One Days going on in our house. Denial is a wonderful thing.

I can’t help wondering, though, what would make you voluntarily choose a vomit-colored top for your vanity? I guess we are all different, and that’s what makes the world the marvellously interesting place it really is.

In fairness to the taste of the previous owners of the house, I have been told that so-called cultured marble yellows with age. Perhaps that is part of the ‘culturing’ process, a bit like yogurt?

So, with the magic that is digital image manipulation, let’s imagine it BEFORE it yellowed:

De-yellowed courtesy of Photoshop

Ummm … nope, still not doing it for me.

Perhaps the decision to buy this was based on budget? Back in the day before the thrill of Craigslist, these were the choices foisted upon you.

Luckily for us we do have it, and during my most recent obsessive Craiglist fit, I happened upon an advertisement for a white vanity top that was the exact perfect size for our upstairs vanity, brand new, unused, still in its box. As a bonus, it was listed as being in our area. And the cost? A princely $20.  Mine!!!

I phoned the number on the ad, and it turned out the guy selling it lived just around the corner from us. Literally. So I jumped in the car, drove 200 yards to his place, and returned with said vanity top in the back. The time elapsed from seeing the ad, to arriving back home again was about 15 minutes. What a buzz!

In 15 minutes we went from having to endure vomit-colored vanity denial with no end in sight, to being the proud possessors of a nice new white vanity top. For $20.  And here it is:

Our new vanity top

Admittedly it is also cultured marble.  But, this isn’t our ‘forever’ vanity top, it is a cheap quick fix until we totally redo the upstairs bathroom, sometime in the next couple of years. And. It. Was. $20. You can forgive a lot for $20.

Now, I could just have removed the existing tap/faucet from the old vanity and transferred them over to the new top, but it also was old and not exactly pretty:

Our existing tap

So, egged on by my awesome vanity top success, I started looking for a new one. And succeeded again! I found this fantastic streamlined hansgrohe faucet for $50:

Oh pretty!

They normally retail for around $230. Score!

So, we get to revolutionise our upstairs bathroom experience for a grand total of $70. Happy happy happy.

Except the cabinet is pretty worn, tired and sad looking. It is also solid wood, and well made (which blows the ‘they bought this because it was what they could afford’ theory). The cabinet is seriously high end. Or would have been back in the day.

Peeling varnish. Not a good look

Nothing that a bit of sanding, an upcycle hack, a bit of paint and some new handles and pulls won’t fix. Stay tuned on that one.

And then I got to thinking about the bathroom generally.  As you do. If I was going to paint the vanity, then what color should it be? And if I am painting the vanity, I may as well paint the wall as well.

We didn’t do too badly on the bathroom décor front. When you consider what we might have had, given the rest of the house, I think we lucked in with the upstairs bathroom.

Bathroom currently

Existing wallpaper is pretty cool!

I actually like the wallpaper, and the pink and blue 50s tile. So, they are staying for the time being. The obvious safe color choices for the walls and vanity would be blue or white.

This, however, is a temporary bathroom fix, not a forever bathroom, so I can afford to be a little playful, a little risk taking, a little out-there. Oh goody!

It seemed logical to play up the groovy 50s vibe we have going on in there already and paint the walls and vanity something funky! A few weeks ago I bought the Benjamin Moore paint color fan decks. So I got them out and starting auditioning colors. Tangerine orange:

Mmm, not really

Lime green?:

Oh, I quite like that ...

Or bright yellow, perhaps?

Nah, I don't think so ...

In the end, I decided to quieten things down a little and go with pink. Not meek quiet baby pink, though. Loud, crazy over-the-top HOT pink.

Oh yeah, loving that pink

The winning candidate was Benjamin Moore Cactus Flower.

Benjamin Moore Cactus Flower

And if you are going for hot pink then it just has to be high gloss. So I now own a tin of Cactus Flower in high gloss. Too exciting.

Then because I was thinking about the upstairs bathroom generally, I started looking at the rest of it.

Existing light is perfectly fine. It can stay.

The ceiling light fixture was fine, so it could stay as it was. The one over the mirror, however, needed a little make-over.

Mmm ... this one needs some work.

I am truly deeply excited about what I am going to do with it, but I am going to keep it as a surprise for you for later.

Stained plastic edging. Ewwww.

The glorious flaccid plastic base board (who knew such a thing even existed?) had to go, but that left me with the gap between the tiles and the floor. What to do with that space? That had me stumped for a few hours. It would be easy to replace it with proper baseboard and paint it, but like most of the upstairs rooms the bathroom is asymmetric, and the thought of cutting the angles to get around the non 90 degree corners was doing my head in. W-a-y too much math.

I could, of course, delegate the calculations to the beloved, as anything mathematical is his department, but the thought of having to accurately saw such an angle was too much.

Luckily I came up with a very cool solution. As it relates to what I am doing with the over-mirror light I am also putting this in the ‘you will have to wait and see’ pile.

Finally, my vision alighted on the floor.

And the floor ...

Those glorious vinyl tiles. As you know, I scored enough Carrera marble tile to do the floor in here at our local salvage yard. So I guess it would make sense to lay it? Well not really, because the toilet and bath also need replacing (the bath has almost zero enamel left on it), and if we lay it before then, we will have to fiddle around with it later, pulling bits up and then maybe having fill in other places. Messy.

And my brain, being my brain, thought ‘Oh I could just find a new glass frameless shower screen, toilet and bath and replace them too.’ Then lay that beautiful marble. I toyed with the idea for a couple of hours, hunting around on Craigslist for a new bath, shower screen and toilet, but I soon came to my senses.

I firmly reined myself in, and reminded myself that this was not meant to be a major remodel.  We are going to do this bathroom properly later. This. Is. The. Quick. Fix.

So it made sense to just leave the floor as it was; it isn’t what I would chose to have there, but it is practical, functional and relatively innocuous.

But there is something about stick-on vinyl tile that just makes your fingers ache to see what it is underneath.

I tried really hard to resist, but I couldn’t help myself. I just had to see if there were mosaics under there, which was conceivable given the age of the tile on the walls.  Plus the floor level in there was considerably higher than the floor in the hall outside, so it seemed plausible. Likely even.

Before I did anything, I thought I had better undertake a reality check, as once I pulled up one corner, I knew it would all have to go. I wouldn’t be able to bear having one unfinished corner sitting there, accusing me. So, I ran my mosaic tile theory past the beloved. And he was in. He watched eagerly as I did a section in the corner behind the door.

And what was under there?

Floor layers

Another layer of stick-on vinyl tile.

And under that? Another layer of stick on vinyl tile. Not 1, not 2, but 3 layers of vinyl tile. Piled on top of one another in a kind of historic décor stratification. Underneath all of that were floorboards. Hence the height of the floor. Ugh.

Alas no mosaic.

So my bathroom quick fix has gone from replacing the vanity top and tap, to painting the cabinet and the walls; fixing the vanity lights; replacing the plastic base board; pulling up all the layers of vinyl tile and painting or varnishing the floorboards. Painting, if they are in really bad condition, and varnishing if they look like they will do ok with a skim sanding.

Which was the solution I ultimately arrived at. All those layers of vinyl tile will have to come up sometime, in any case, and it is sadly too soon for my lovely marble.  Plus I think varnished or painted boards will look way better than the vinyl tile ever would.

Now I am wondering what color to paint them, if I have to. Not pink I don’t think, there is a limit. Seriously. Maybe blue … or … the verdict is still out on that one.

I think you can already guess what I will be doing after finishing the last few studio-finishing projects. That’s right: not painting the hall as planned. The upstairs bathroom got shuffled to the top of the list. It’s all Craiglist’s fault. And I can’t wait to get started.

Stay tuned for updates. I might even go back to daily posts once I get going.

Totally marble-ous

I love it when serendipity throws things your way.

The beloved replaced some of the light fixtures (or light fittings as we would call them in Australia) in our kitchen and downstairs bathroom the other day (and there is a post coming on that in future). So we had 4 unwanted light fixtures to get rid of.

We could have thrown them out, but who knows, maybe someone might have a use for them? So instead of adding them to landfill, I took them down and donated them to our local salvage yard.

Now, I have remodeled enough houses on a low budget to know that you never EVER go to a salvage yard without having a good look around. You never know what gem you might find. They have new stuff coming in all the time.

I carry all of the measurements for things I want to replace or fix in the house in the notes section of my phone. That way if I do see something I like or need, then I know if it is going to fit and I can grab it.

So when I found two boxes of Carrera marble floor tiles tucked away on a bottom shelf among boxes of other dreary uninteresting tiles I whipped out my tape measure (yes I am a sad puppy who permanently has a tape measure in her bag), counted the tiles, did some multiplication, and realized that there was enough full tiles there to do the upstairs bathroom floor. Plus there were a stack that had been cut in half, and then a smattering of broken ones.

Two crates of marble tile, just waiting for me

Then I went into haggle mode. The beloved is much much better at haggling than me, but I have learned a few tricks from watching him in action. I knew by the layer of dust on top of these tiles that they had been there for a while. So I figured I was in with a chance for a bargain.

The tiles had a sign saying $1.60 each sitting on top, I found one of the guys that works there, put on my most winning smile, and asked him how much it would be if I took the lot off his hands. We settled on 75 cents per tile for the full size unbroken ones, and he threw in the others for nothing.

75 cents per tile for tiles that normally cost AT LEAST $7 per tile. $7 was the cheapest I could find them for on the internet. B.A.R.G.A.I.N.

Of course, when I got them home the beloved said he could have got them for 60 cents or less, but that was just his haggling pride talking. Actually, if he was there, he certainly would have got them for less, he truly is king of haggling, and I stand humbly in his shadow.

75 cents per tile instead of $7? That will do me!!

As it is I am doing a happy dance. Happy happy happy. That bathroom is going to look amazing with these tiles on the floor.

Before I get to the upstairs bathroom, though, I have so many other things to do. In the meantime, it is great to know that one of the items on our ridiculously long list of Things We Need For The House has been found.

Now I am off to file them in our undercroft until they are needed. Happy happy happy.