Or: How To Steam Punk Your Vanity Cabinet.
Last week I promised that this post would be the big upstairs bathroom reveal, but I am not quite there yet. Those little finishing off jobs take forever.
In the meantime, I thought I would share with you what I did to the very drab and outdated vanity cabinet we had in there. Here is what it looked like when we bought our place:
It clearly needed something doing to it. I am so excited with how it turned out, and it shows how with a few materials, and a little bit of ingenuity you can really have some fun.
The vanity has been through a number of potential manifestations. Initially, I thought I would paint it hot glossy pink like the walls. This would have worked with the white replacement vanity top I found on Craigslist, but then that got upgraded for the marble one I found for $25 at the salvage yard. I quickly realized that the top wasn’t really going to work with pink, so then I thought I would paint it blue.
That didn’t really do it for me either. It just looked sort of … nothing.
Then the whole floor saga happened, and I ended up laying the marble floor tile that was also a salvage yard find.
And then What To Do With The Vanity started really really bugging me. Because the vanity top is cream/off-white marble and the floor tiles are bright white and grey Carerra marble. I knew the snow white of the floor would make the vanity top look dirty. White and cream do not go together. At. All.
I thought the beloved would probably divorce me if I bought yet another vanity top (and who would blame him?), so the What To Do With The Vanity dilemma took on epic proportions. Whatever I did needed to ease the transition between the white floor and cream top. To work, it would have to be something that would distract the eye from comparing the two, but at the same time fit with both. Piece of cake, really.
It was the steam punk makeover of the vanity light that gave me the idea.
I could give the vanity cabinet a steam punk/industrial feel.
So what is steam punk, I hear you ask?
Steam punk is a design genre that emerged in the late 1980s and 90s. It spans literature, film, fashion, furniture, architecture and art, and incorporates elements of science fiction, fantasy and horror. Steam punk proposes a kind of alternate history. Imagine if the technology of today was married to the aesthetic of the Victorian age industrial innovations. Vast cast iron railway bridges and steam engines morphed into futuristic, but analogue, machines. My Fair Lady meets Barbarella.
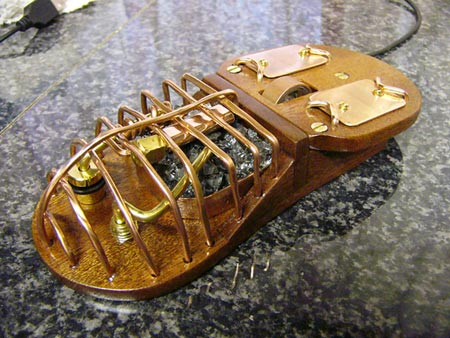
This mouse is a great example:

Steam punk computer mouse. Image source
You get the picture.
My steam punk vanity would be clad in metal, and … and …
And have rivets.
Rivets. I love rivets.
I remember saying that to the guy that ran the metal and wood shop at Uni and he looked at me like I was deranged. And you know you have said something particularly weird, when someone who works at an Art School looks at you like that.
Seriously though, rivets are fabulous. Think of the Golden Gate Bridge, for example:
See? Aren’t they pretty? It’s the repetition, and making your method of joining part of the surface decoration, celebrating the join. You show how it was made, so you can marvel in the miracle of what was then modern technology.
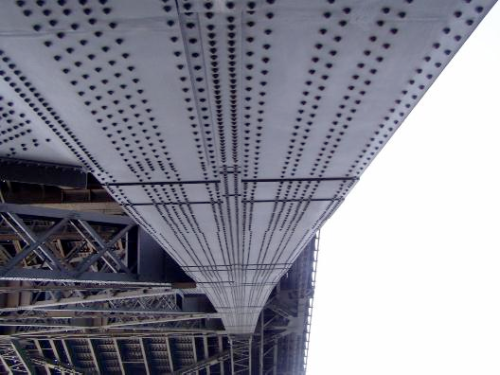
My obsession with rivets probably really fully flowered when I lived in Sydney, and regularly traveled the Sydney Harbour Bridge, though:

Sydney Harbour Bridge rivets. Image source.
I drove over the Sydney Harbour Bridge to my studio every day for 3 years, and it never got old. Was I looking at the spectacular view of the beautiful Harbour? No, I was checking out those wonderful rivets. Every. Single. Day.
There is something about rivets that evokes the spirit of those late 19th Century engineering marvels, when nothing was too wide to be spanned with some lengths of cast iron rivetted together. Both the Golden Gate Bridge and The Sydney Harbour Bridge have this air about them, even though they were built the 1920s and 30s.
Nothing says ‘steam punk’ like a few rivets.
It goes without saying that my vanity had to have rivets, or something like them. I wanted to do something different with the drawers and door, though.
There I would need something to cover over that outdated moulding, and the hinges, handle and pulls would need changing, too.
What to do with them, though?
The previous owners had a pegboard wall in the garage, which I had pulled out while I was converting the garage into my studio. I kept the pegboard because I had toyed with the idea of painting it, and making one of those tool walls with the outlines of the tools on it.
This was revised, though, when I realized that the repetition of the holes would be a perfect counterpoint to the pattern of the rivets. I had found what I needed to cover that moulding.
Because the pegboard had holes, I spray painted the doors black first, so that the wood would not show through once the pegboard was attached.
I cut the pegboard to size, and then attached it.
Then I spray-painted the door and drawers matt black.
After that I turned my attention to the cabinet.
I love the way my brain works sometimes. You remember the aluminium flashing I used to line my card index drawers? I realized this would make the perfect metal covering for my vanity. Easy to cut and nice and shiny.
I also remembered the decorative upholstery nails that I bought to use on my rocking chair, but decided they were too shiny and used black ones instead. They would make p-e-r-f-e-c-t faux rivets.
I set to work attaching the metal, and adding the nails/rivets around the edges of the metal panels.
Once that was done I added new stainless steel hardware to the door and drawers.
First the hinges.
And then the pulls.
Then it was simply a matter of reinstalling the vanity, which only took about half an hour. One advantage of spending days installing the new top and faucet initially. All the hard work was done, and I just needed to hook it up.
So, here is a reminder of what the vanity looked like originally:
And here it is now.
Quite a difference, huh?
The steam-punking of the vanity cabinet sparked off some other great ideas for the space. And until those things are finished, and installed in the upstairs bathroom, you are just going to have to wait to see it complete. Suffice to say that I have spent a very happy and very productive week in the studio tinkering around making stuff.
So expect some more posts over the next few days, and get ready for the big bathroom reveal.
Just as soon as I can get it done …


